Showing posts with label tutorials. Show all posts

Sunday, January 25, 2015

Foiling at Home: Tutorial

Let's be honest if you know me at all you know I love all things shiny and glittery.  So it was no surprise that once I learned I could foil at home I was "like a little kid in a candy store" (direct quote from by good friend Connie who saw me light up at CHA 2015).   So FINALLY here I am to show you how to do this and share what I learned to make you a pro in a flash!

Tools you will need: 
-Laser printer (the foil is toner activated so you need this type of printer)
   *I purchased and bought this exact one from Amazon: Cannon LBP 6000
-Heat Laminator:  After research and seeing it in the booth here is what they used Royal Sovereign 9" or here is the 12" version one if you have a wide format laser printer.
 but I found this one with the same qualities and the ability to take thicker material Scotch 9"
-I used Photoshop to design my images, but any program to use fonts and shapes will work.
-Deco Foil.  You can order the larger sheets of Heidi Swapp foils as well, but they won't be in until late March.  So run, no seriously don't walk, to your local Michael's or box box store and look near the punches and embossing powders for the tubes of foils.  They retail at $4.99 each but you can use a coupon and often they are near the card area with a 40% off sale sign.
-Legal photocopy paper, to fold in half as your pocket.

Quick and easy steps:
1) Design your images and print with laser printer.
Some notes:  Post foiling I had to adjust the toner to "darker" and change the monochromatic (under print settings) to SOLID not pattern, so that everything would print and be dark black.

2) Trim and cut the chosen items to be foiled

3) Use a piece of your legal copy paper and fold in half to create a "folder."  Place the foil over the image SHINY side up and in the of the folder. 


4)  Feed the folder into the laminator CREASE first:  
Be sure to check out this video for the very first at home gold foil reveal! 

**Note:  I learned to run it through TWICE...  I just wrote a 1 on one side of the folder and a 2 on the other side of the folder.  Once I ran it through side 1 I flipped it over and ran it on side 2.  I learned this gave a double heat so that the foil adhered better!  This is a before adjusting the toner level and running it twice and then after: 
The left is the twice run and the right is the single run.  You can see some foil didn't adhere in the reflection. 

This was so much fun!  My mind is swimming with ideas.... take a peek at what I have created so far:
Flair, Thank you cards, a sheet I can use punches on. 

Here I just printed a toner square and punched out a scallop heart now I have the negative and punch for a project! 

Please share your projects and thoughts on at home foiling!  ENJOY! 

If you want more tips and tricks,  be sure to come join the all new "Scrap it Up 365" community!  
We all know how hard it is to pack a bag and head to the local scrapbook store to scrap with friends.  So we have created a private community where you and your friends can come hang out 24 / 7 / 365 to be inspired, create, and share.   Come check out our full event calendar for February 2015!  See you there! 
 Your scrapbook home away from home! 


Wednesday, December 10, 2014

On the 10th Day Of Christmas....

... We bring a new gift to thee.....

Come on sing it with me now??   Who has carols pumping through the house and their tree up?  Now that we are in the spirit let's round the bend and get our cards done and out the door!


I'm BACCCCKKKK!!! And today I bring a quick tutorial on how to add and change out drop shadows!  In this tutorial I am using CS6 version, in PSE you can follow along in most versions until I separate the shadow onto a new layer.  In older versions of PSE you cannot put the shadow on it's own layer but you can still change the color... and of course I will show you how!


To get started open up the template for the card #10 given to you in the email.

1) Choose a chunky or bold font to type out your title.  Here I used Cooper STD, which is free.

2) I typed each letter of "merry" on it's own layer, so that I could change the colors or add pattern as I desired without changing the whole word.

3) Use the tutorial on alignment and distribution from Dec 2nd (here if you missed it).

4) Now I used papers from the kit this card was made from because I like the texture added in.  But you can easily just change the color of the letters to suit your needs.

5) Now that each letter is complete with pattern paper, you can merge it and make it into one word.

6) First you need to rasterize the type and then make them all one layer.  Select ALL the layers of the word you are working with.


7) Add a stroke to the word.  I used size of about 20 here.
Layer --> Layer Style --> Stroke


FOR PSE USERS... HERE IS WHERE YOU CHANGE YOUR COLOR TO MATCH YOUR CARD.  CLICK JUST TO THE RIGHT OF THE SIZE LINE AND THAT IS YOUR COLOR CHANGE OPTION.

8) Put the stroke on it's own layer by clicking the word "Stroke" on the layers panel and using the drop down menu that says "Create layer"

9) Once it is on its own layer you can manipulate the color and or add another pattern to it as well.

10) Finally I decided I needed a little more oomph to the word so I added a SECOND stroke to both the "merry" and the stroke outline... only at 7 this time and a green to make them pop.

11) Add in a small drop shadow and you have a beautiful title on your card.

Note:  You can do this for more than just words.  I repeated this WHOLE process to add an exact matting around the rectangle in the template so I wouldn't have to guess size or alignment!  Give it a try!  Here is my finished card... Be sure to share yours with us!  ENJOY!

It's not to late to share the fun with friends.. get them in on the 12 Days of Christmas cards and envelopes by signing up here. 

For this card I used the "Christmas Wishes" Digital kit that can be found in my shop on Etsy here. 


Tuesday, December 2, 2014

Day 2 of 12 Days of Christmas Cards

Hello!   Today I am here with my Christmas card for sketch and template #2 on the route for the 12 days of Christmas Cards and Tutorials!   Here is the card I made using CS6 digitally with the template and then I printed it out both the card and envelope so they are ready to send off!


In this tutorial I will show you how to use one of my favorite techniques to align your elements and perhaps photos and mats perfectly and quickly every time!   I will show you screen shots from PSE 10 since that seems to be the most common program ... enjoy!  

We are going to add stars to the circles in the template.  

1) So once you open the template and clip your pattern paper to the circles merge the layers for easier movement on the card. (Shortcut CMD + G for Mac  Alt + G for PC)


2) Now add the star and drag it over near the circle.  As you can probably tell it is pretty difficult to get it to line up perfectly and evenly inside that circle.  So here is the secret...

3) Select BOTH layers, the star and the circle embellishment.  Now for PSE go to the top where it says "Align" and select the option to "Align vertical centers" from the drop down menu.  Repeat and select the "Align horizontal centers" option to make sure it is centered completely inside the circle.


VOILA! 

4) Add a little drop shadow to each of the two layers and it is perfect!

*Quick tip:  You can do this as well if you have embellishments that need equal spacing.  By using the option right next to "Align" the "Distribute" function.  This is perfect if you are adding in buttons or something.  You can Align them so they are all even along the bottom or top, and then distribute them evenly along a certain space!   Great tools for making things even and spaced!

For this I just duplicated one of the circles and made it three.

1) Choose the "Align" menu and align the bottoms of the circles because as you can see they are not even after I copied and moved it.

2) Select the distribute menu now and distribute centers:


EASY right?   I love this little trick for adding in buttons or sequins and having things spaced for me so I don't have to do all the zooming and guess work!

For this card I used my brand new "Christmas Wishes" kit available in my Etsy store here.


Thanks for stopping by... if you have friends that want to join in on the fun be sure to have them sign up for the 12 Days here! 

Tuesday, March 27, 2012

Tutorial Weaving Elements

Afternoon everyone! I am sharing a tutorial I did forSimple Girl Scraps Ct on how to weave together elements (specifically ribbon) to create the layered look that we often see in clusters and on pages. I am showing this to you in PSE9 - enjoy!

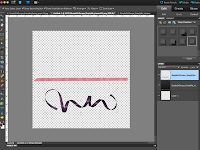
1) Select two ribbons, one spiraled and one straight, and bring them onto your workspace. Here I am using the "Simply Me" kit by Simple Girl Scraps.

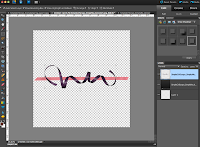
2) Drag the ribbons over each other as shown. I usually put the curly ribbon on the top (but it really doesn't matter in the end)

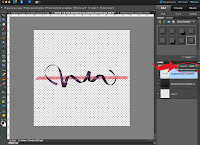
3) Change the opacity of the top curly ribbon to make it easy to see the bottom ribbon.
After with opacity at 60%:

4) Zoom into the project so you can clearly see the area you are working on (Control and +)

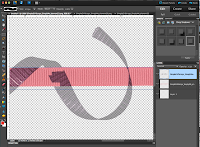
5) Using the eraser tool, erase the parts of the curly ribbon you want to appear behind.
NOTE: look at your ribbon and whether it is shadowed or not.. decide how you want the end result to look. Meaning if you start to erase a top curl, do not then turn and erase a bottom curl that will leave it conflicted on the page. Because of this I use the bottom curls to appear to be under the straight ribbon.

Be sure to select the proper eraser style / size. I used the square brush because my back ground ribbon is flat and straight. Sometimes the round brush is easier. Make small erases at a time because if you go too far over the lines of the other ribbon you can always undo (control+z) without having to go too far backwards with big strokes.

6) Be sure to zoom in nice and big so you can get close to the edges without it going over and visa versa. In the picture above the top is great the bottom I will control +z to get a better line without the background showing through.

7) Once you are done go ahead and zoom out (control and -) and then change the opacity back to 100%
VOILA!!!

8) Add flowers, or another ribbon, stars, any embellishments you would like to complete the look!!

This tutorial is also good for things like:
-Weaving papers (see example, but use the marquee square tool instead of eraser)
(Papers: Every Spring Collection kit by Simple Girl Scraps)

-Weaving flowers together... sometimes you get so many layers in with a bunch of flowers you cannot always have it be on top of one and under another so here you can erase just the part you want to appear hidden. -Using clips and paperclips. Make them opaque and erase what is supposed to be behind the picture or journaling square.