Wednesday, April 25, 2012

Silhouette Freebie and Journal cards

New Facebook fan freebie up today!  For a limited time you will get BOTH the Silhouette files to cut out 3x4 cards AND one set of 3x4 journal cards png files made from the Silhouette files.  In order to get these you must be a facebook fan! 

These cards and cut outs are good for Project Life / P52 / Week in the life!
~Enjoy~ 

Sunday, April 22, 2012

Sisters layout plus FREEBIE


Don't forget to stop by Scrapping Fairytales to grab the NEW kit "My Tunes" from Simple Girl Scraps! This kit has everything from amazing colors, to great embellishments, to a very cool clear alpha!  Sure to whet you appetite!  


Here is a layout I made with the kit.  One of my favorites for sure!


A  CT freebie from the brand NEW "My Tunes" kit. A set of journaling cards to include 2 cards easily set up for photo additions!  Click here to download.

Tuesday, April 17, 2012

Project Life:


I have been working hard at this all year. I think other than being married and having kids this is the longest I have routinely stuck to something. I have been scrapbooking for 12 years now, but it is "when I have time" this is something I love and have been loving since day 1! I wanted to share a page from the recent weeks and post a link to the FB group where people can get together and share ideas, and pages, thoughts, findings etc. If you are unfamiliar with Project Life / P52 / P365 there are TONS of links, videos, and websites to help fill you in and get you started. Happy Scrappin'

Facebook Group: Project Life


Monday, April 2, 2012

Spring Has Sprung Freebie


Morning all! :)

I have a Freebie for you from the *NEW* "Spring Has Sprung" kit by Simple Girl Scraps. You can find the full kit at Scrapping Fairytales.


Here is a CT Layout I did:
Be sure to head on over to the store and the kit now... it's 40% off this week! :)


And now here is the freebie I made for you to go along with all those great pages!

Tuesday, March 27, 2012

Tutorial Weaving Elements

Afternoon everyone! I am sharing a tutorial I did forSimple Girl Scraps Ct on how to weave together elements (specifically ribbon) to create the layered look that we often see in clusters and on pages. I am showing this to you in PSE9 - enjoy!

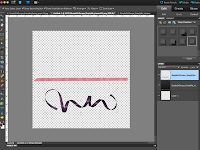
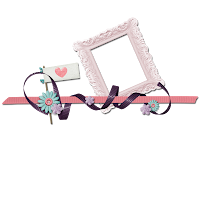
1) Select two ribbons, one spiraled and one straight, and bring them onto your workspace. Here I am using the "Simply Me" kit by Simple Girl Scraps.

2) Drag the ribbons over each other as shown. I usually put the curly ribbon on the top (but it really doesn't matter in the end)

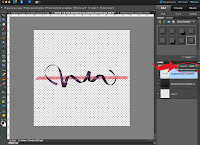
3) Change the opacity of the top curly ribbon to make it easy to see the bottom ribbon.
After with opacity at 60%:

4) Zoom into the project so you can clearly see the area you are working on (Control and +)

5) Using the eraser tool, erase the parts of the curly ribbon you want to appear behind.
NOTE: look at your ribbon and whether it is shadowed or not.. decide how you want the end result to look. Meaning if you start to erase a top curl, do not then turn and erase a bottom curl that will leave it conflicted on the page. Because of this I use the bottom curls to appear to be under the straight ribbon.

Be sure to select the proper eraser style / size. I used the square brush because my back ground ribbon is flat and straight. Sometimes the round brush is easier. Make small erases at a time because if you go too far over the lines of the other ribbon you can always undo (control+z) without having to go too far backwards with big strokes.

6) Be sure to zoom in nice and big so you can get close to the edges without it going over and visa versa. In the picture above the top is great the bottom I will control +z to get a better line without the background showing through.

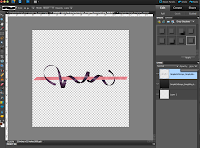
7) Once you are done go ahead and zoom out (control and -) and then change the opacity back to 100%
VOILA!!!

8) Add flowers, or another ribbon, stars, any embellishments you would like to complete the look!!

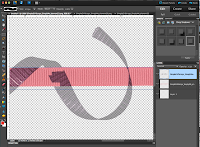
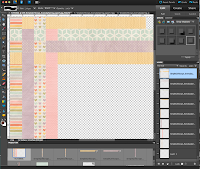
This tutorial is also good for things like:
-Weaving papers (see example, but use the marquee square tool instead of eraser)
(Papers: Every Spring Collection kit by Simple Girl Scraps)

-Weaving flowers together... sometimes you get so many layers in with a bunch of flowers you cannot always have it be on top of one and under another so here you can erase just the part you want to appear hidden. -Using clips and paperclips. Make them opaque and erase what is supposed to be behind the picture or journaling square.


Thursday, March 8, 2012

Simply Beautiful ME...


I am loving this page "Simply Beautiful ME.." It is often that I find while scrapping events that as the camera person I rarely get pictures of me... so when it was a girls weekend in the Bahamas I was pleased to come home with several pics of ME... haha! I used the kit "Simply Me" by Simple Girl Scraps, which I love just as much as the layout... this kit will go for for many pages esp with my little girl... check it out on sale this week for $2 at Scrap Delicious!


Wednesday, February 29, 2012

WEEK 6 - Project Life


Front side of 8.5x11 and ATC pocket attached to side of sheet


View of 4x6 sheet and back side of 8.5x11


The 12x12 layout for title page of week 6.


So I have been keeping up pretty well, until my trip two weeks ago. I am have finally found time and finished week 6... glad to be using the multiple sizes of photo pages so I can keep my week all 'gathered' in one area. Here I used an 8.5x11 sheet and made a double layout in one sheet (front and back) and then I added an ATC sized pocket to describe the pics and hold my airplane ticket. Finally on the last page I used a We are Memory Keepers 4x6 divided sheet to finish of random parts of the week.... enjoy! :) and now on to week 7... weeeee!