Sunday, January 25, 2015

Foiling at Home: Tutorial

Let's be honest if you know me at all you know I love all things shiny and glittery.  So it was no surprise that once I learned I could foil at home I was "like a little kid in a candy store" (direct quote from by good friend Connie who saw me light up at CHA 2015).   So FINALLY here I am to show you how to do this and share what I learned to make you a pro in a flash!

Tools you will need: 
-Laser printer (the foil is toner activated so you need this type of printer)
   *I purchased and bought this exact one from Amazon: Cannon LBP 6000
-Heat Laminator:  After research and seeing it in the booth here is what they used Royal Sovereign 9" or here is the 12" version one if you have a wide format laser printer.
 but I found this one with the same qualities and the ability to take thicker material Scotch 9"
-I used Photoshop to design my images, but any program to use fonts and shapes will work.
-Deco Foil.  You can order the larger sheets of Heidi Swapp foils as well, but they won't be in until late March.  So run, no seriously don't walk, to your local Michael's or box box store and look near the punches and embossing powders for the tubes of foils.  They retail at $4.99 each but you can use a coupon and often they are near the card area with a 40% off sale sign.
-Legal photocopy paper, to fold in half as your pocket.

Quick and easy steps:
1) Design your images and print with laser printer.
Some notes:  Post foiling I had to adjust the toner to "darker" and change the monochromatic (under print settings) to SOLID not pattern, so that everything would print and be dark black.

2) Trim and cut the chosen items to be foiled

3) Use a piece of your legal copy paper and fold in half to create a "folder."  Place the foil over the image SHINY side up and in the of the folder. 


4)  Feed the folder into the laminator CREASE first:  
Be sure to check out this video for the very first at home gold foil reveal! 

**Note:  I learned to run it through TWICE...  I just wrote a 1 on one side of the folder and a 2 on the other side of the folder.  Once I ran it through side 1 I flipped it over and ran it on side 2.  I learned this gave a double heat so that the foil adhered better!  This is a before adjusting the toner level and running it twice and then after: 
The left is the twice run and the right is the single run.  You can see some foil didn't adhere in the reflection. 

This was so much fun!  My mind is swimming with ideas.... take a peek at what I have created so far:
Flair, Thank you cards, a sheet I can use punches on. 

Here I just printed a toner square and punched out a scallop heart now I have the negative and punch for a project! 

Please share your projects and thoughts on at home foiling!  ENJOY! 

If you want more tips and tricks,  be sure to come join the all new "Scrap it Up 365" community!  
We all know how hard it is to pack a bag and head to the local scrapbook store to scrap with friends.  So we have created a private community where you and your friends can come hang out 24 / 7 / 365 to be inspired, create, and share.   Come check out our full event calendar for February 2015!  See you there! 
 Your scrapbook home away from home! 


Monday, January 12, 2015

CHA day 2- Round up!!

So Day 2 did not have any mind blowing moments but, since all the excitement had soaked in I was able to be a little bit less "ahhhh" and a little bit more "ooh" or maybe I just added in "ooh amongst the draw dropping!  You know like a pro!  Although I won't lie it began to feel a little sad, as I wandered back through places I realized I was both in heaven and hell.  I was in the biggest scrapbook store IN THE WORLD and my burning itching money was worthless!  I could look and touch but I couldn't play!  Not until "... Ships in mid to late February" kept echoing in my ears all weekend!!  

<insert concerto of sad violins here> 

So I made a list of places to go back to and places I hadn't gone, plus the requests of some fellow friends new and old so here's the scoop: 

I fulfilled my desire to want by wandering around and seeking out make and takes, and let's not lie sitting down after an entire day on my pregnant feet was a dream.  So I made stuff... A lot of stuff.  Best make and take ever... Spellbinders!  With their luxurious booth I wanted to move into and all the pretty pretty things it was love at first sight!  

-Best Creations, the company that has the most amazing glitter tape ever.  Is making the most amazing glitter paper ever and it's iron on.  So my ideas...1) ironing on paper is not unheard of.  2) just glue or staple it anyways 3)use it for EVERYTHING!  It's flexible, waterproof... Hint hint cutter people! And it's fixable.. No flaking, no mess... Just awesome!  And look I made this: 
I thought it was a change purse I was later informed it is a cell phone purse... Oh, yeah I see it now!  ;) 

-I then went around and over to Moxie.  I love this company because they are small and yet they are unique and outside the box without being over the top... Remember the zombie paper at Halloween? Yes, they rock! 
So they have some amazing little lines... A Color Run line I KNOW many of my friends, and myself, NEED and a super cute scrapbooking line.  *ding* <--- That is the sound of a lightbulb going off.  Someone FINALLY has paper to scrapbook about when we all get together to use paper and scrapbook.  Loved it!  


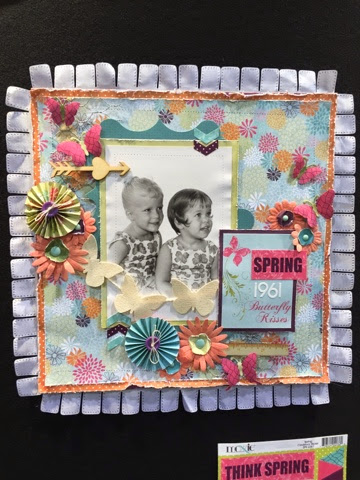
Ps... The way they displayed their layouts SO CUTE.  And I learned how they did it... Ruffled fabric they cut apart and sewed the ribbon ruffle to the pages!  Could that be any more cute?? 

-Bella Blvd was full of the most beautiful layouts at the entire show!  I loved them all... And their new product is just so exciting!!  


-For all my die cut fans another company I haven't heard of before Taylored Expressions had some adorable dies... 


-As did Sizzix.  We ran into this gal Eileen Hull who let us sit and even request personal made items from her new adorable collection of 3D dies that were to die for!  

I mean like seriously... Look at that trunk and tool box made with real metal plate papers.  That mini book die took all of 10 minutes to assemble and is so cute.  The possibilities with these are ENDLESS..!!  


-Made it to the beautiful prima booth where they debut their new collection of water color pencils and tricolor family alcohol markers.  Sadly no demo or ability to try them out but they looked pretty.  They plan on releasing more colors in the spring and summer so stay tuned if you love that. 


-Ken Oliver had a pretty unique set up of ink pads... I loved how well traveled they are and the vibrance of the colors.  They store like a USB and you push up the button and then a velvet (not foam) ink pad pops out.  Easy for inking stamps, distressing edges, and the color is smooth and silky!  Dries fast.  He did a demo of spraying first with water and make the water color effect they blended beautifully! 


-FINALLY found a demonstration of the widely asked about FUSE tool from We R Memory Keepers.  This was something that intrigued me but wasn't on my must have list... And now I am counting down the days! It is pretty cool!!  I know there are hacks floating around about using the irock by imaginsce but I do agree that the dotted lines are appealing.  If you know me at all you know I like to push the limits so I asked what I felt was an obvious question... "Can you Fuse acetate to your pages?"  The gal looked shocked to hear me ask and said she didn't know but quickly ran off to grab some and was happy to try it out... The answer:  YES!  Oh imagine the possibilities now!!  Some hints... Go extremely slow, score the acetate first, and run it twice.  It will take some practice so use a spare page protector and scrap first.  The thicker acetate will more than likely not work... But the thinner stuff did!  How fun is this going to be?  Ships to stores late February and big box stores in April.  So if you want to use a Michael's coupon... You will have to wait!  


-Jumping into the mixed media for the final post.  Met Diane Wakley who was just a sweet and fun gal.  I loved her matter of fact humor and her honest chat.  For mixed media she said this: 
"The best pen for writing over light colored acrylic paint is the Fudeball.
Best pen for over crayons or oil based paints.. There is none.  
Best pen for over dark stuff... There is none that work for more than 3 weeks.."
She was showing off her new tips that go right into paints to make them fine points. It was interesting.   I do love the ability to write or doodle in paint.


In other mixed media news: her stencils are awesome she has 9 news ones coming out. When asked her faves.. She loves the floral leafy thing she called it and the alphas.. And her new obsession polka dots!  Ha! 

New stamps by Nathalie Kalbash from Stampendous look oh so delish!  And they will be putting out their version of the Gelli Plate called Creative pallet which is much thinner and yet has the same giant booger feel.  For those interested in gelli printing this looks like a good option.


I will brag a little that I did stop by the Simple Stories and as I know the designer, Traci Reed" who did the "simple stories packs" I just had to touch her stuff and show off only to get busted by Layle herself.. But it was all in good fun!  I also found out that I was losing creative juices when we were given buttons to fill in the blank of "I am..." And lost to Instagram for a chance to win their new line of product when after a serious 4 minutes of thinking I wrote "me".... Really?? That was the best I had...?? Anyone else hear the sad deflating ballon and trumpets going *whomp whomp whomp* in the background?? 


I did go to Every. Single. Booth. I touched, saw, talked to, and made a lot of stuff... If you want to know about anything else please ask! 

In closing I not only met my new idol April from Crystal Ninja who was covered in head to toe handmade rhinestone suit that took her all of 290 hours (including the shoes) but was happy to let her know my nickname of "bling queen" would happily relinquished to "princess of bling" as long as I could be her crafty side kick!  She was awesome!


I failed to mention the tycoons of the industry on purpose because I feel I can write up a separate post about Doodlebug, Echo park, and all the others later.  They didn't jump at me and say "oh what a great line and you must share this immediately..." So we can do a designer round up post CHA.  

Thanks for joining me!  Scrappy hugs to all! 

Sunday, January 11, 2015

CHA 2015- day 1

CHA updates....  What blew my mind and what I wanted to share: 

*note...I'm doing this from a hotel room on my iPhone so please forgive any nuances the app / phone decide to throw in there!*  ENJOY!! 

1) Biggest mind blow of the day... We all know I love glitter and shiny things. so I was super excited about seeing the heidi swapp "Minc" in action... But the retail price tag had me going *whomp whomp whomp* and then like a magical fairy Scott from iCrafy deco foil showed up in my life... Are you ready?? I don't think you you... Are you...!?! 

IT IS JUST A GIANT PAPER LAMINATOR... Say what the what..? He even said "Get the one from michaels that is like $49.99 and use a coupon."  Yes... And HIS foils work on...  FABRIC, with regular liquid Glue, an awesome dilute adhesive for chipboard... And yes of course I can laser print ANYTHING and use it in the machine.  For more details or specific info.  PM me..  :) 


Other honorable mentions...
-hazel and Ruby has some awesome new washi tape, and it's bigger than your head!! It goes on books, walls, in frames whatever.  You use your awesome copics (or even sharpies) he said and write / color them
In!  They have black chalkboard calendars and planning ones for the house... Use a chalk marker and erase. After several uses it gets mucked up so just change it out from the roll! 


Of course dah-ling ❤️❤️

-Dyan Reaveley is amazing... She is just super awesome and fun and oh so inspiring. She has new paints coming out (in Feb like everything else) that are just *kisses hand like an Italian* MAGIC!!  You could apply the paint and within 30 seconds she would flip the page and use left over paint on the dauber for another page!!  It was mind blowing to see her work so efficiently and quickly.  The paint was smooth and clean... One gal even tried it as makeup...ha I'm kidding. But she did go to smell it and ended up with it on her nose, so should you ever feel uninspired go ahead paint your face!  ;) 


Her best moment "Don't think about it... All your stencils work the same.  The paint the same, your hands the same... They are there just use them and do it" 

PRICELESS!!!  

-Maggie Holmes has a new collection "Confetti" it's beautiful... But as awesome as it is alone (to my own heart be true... GLITTER!) there was this adorable wood veneer 12x12 frame that we were already planning decorations for!  Check it out!  

Clear stuff, and glitter, and tassels oh my!! 


-Spellbinders dies... These usually leave a lot to be desired with me personally.  They just never grabbed my attention.  But the new releases coming out... Wow, just wow.  It's a whole new look and audience I feel! Fun, fresh, useful in so many projects.  The ones I loved were the 4x6 dies (pictured here) that were die cut and embossed.  Perfect for any card or pocket page as is...loved the banner display they made!!!  *swoon* 


-Art Anthology: for my mixed media peeps.  Was BEAUTIFUL!  The have some new stuff coming out.  In their mixed media / texture line they have a product called "Mud" that is light and smooth dimensional product.  Add paint or most to it for color and... Boom!  Use with stencils or just spackle it on your work area.. Good stuff.  I mention it though mostly because it is lightweight AND flexible.  I struggle with finding a medium I can use on tags and cards that won't crack if I choose to mail it or add it to a page where it will often end up flipped through in an album.  So this was a huge bonus. Plus of course they have new sprays "Fairy dust" so pretty and some stuff called "gem stones" that add a colored lacquerish coat, that of course is color matching to their paints, on projects.  It was a small booth packed with a huge oohs and AHHs and even some great gals!  

And we were told a very top secret secret... She used a tuna can for the center... So funny!!!   
As I always say "nothing in crafting is garbage."  This proves to me I am not using ALL of my resources, bwahaha! 


-I met and chatted with Shimelle, she is just as adorable as you would imagine.  And her line is pretty sweet!  I do have to say just chatting with her was the icing on the cake though, until she stepped around the corner and was wearing Dorothy's Ruby red pumps!  *swoon* so cute!  And I did learn... Yes she is from Kansas!  Everyone now... "Awe!" 

Of course a quick pic of the shoes: 

Some things were just as the usual... Nothing too shocking color wise.  A LOT of the gold and even silver foils all over.  Keep riding that trend vendors, it's beautiful.  (PS... Anything but the bird fad... Eek gads!)  The planner fad is HUGE almost everyone is doing it... So if you love it you're in luck.  I really liked Me and My Big Ideas line, although their "binder" was not my style...  The addins and choices were cute.  If you don't love it, well too bad they are going to be shoved down your throat until you look into the spinning black spiral and fall into the trap like everyoe!  Ha!  

Stay tuned for more on day 2 here at CHA...! Thanks for stopping by!! 

Oh yeah... And this happened: ;)
 Gotta love the hubby!!